
DSP on the ESP32 With Faust
The ESP32 is an inexpensive microcontroller providing built-in Bluetooth and Wi-Fi support, many GPIOs and analog inputs, etc. Its extremely low price (a few dollars) makes it very attractive, and it is being used in an increasing number of boards. A wide range of "unknown/secret" development boards targeting audio applications are based on the ESP32 and can be found on Alibaba/AliExpress. While most of them target the development of "intelligent speakers" (e.g., Alexa, etc.), they host all the components needed to carry out real-time DSP applications and can therefore be used to develop digital musical instruments, effect processors, synthesizer hardware, etc. The TTGO T-Audio and the ESP32 Audio Dev Kit are good examples of such boards.
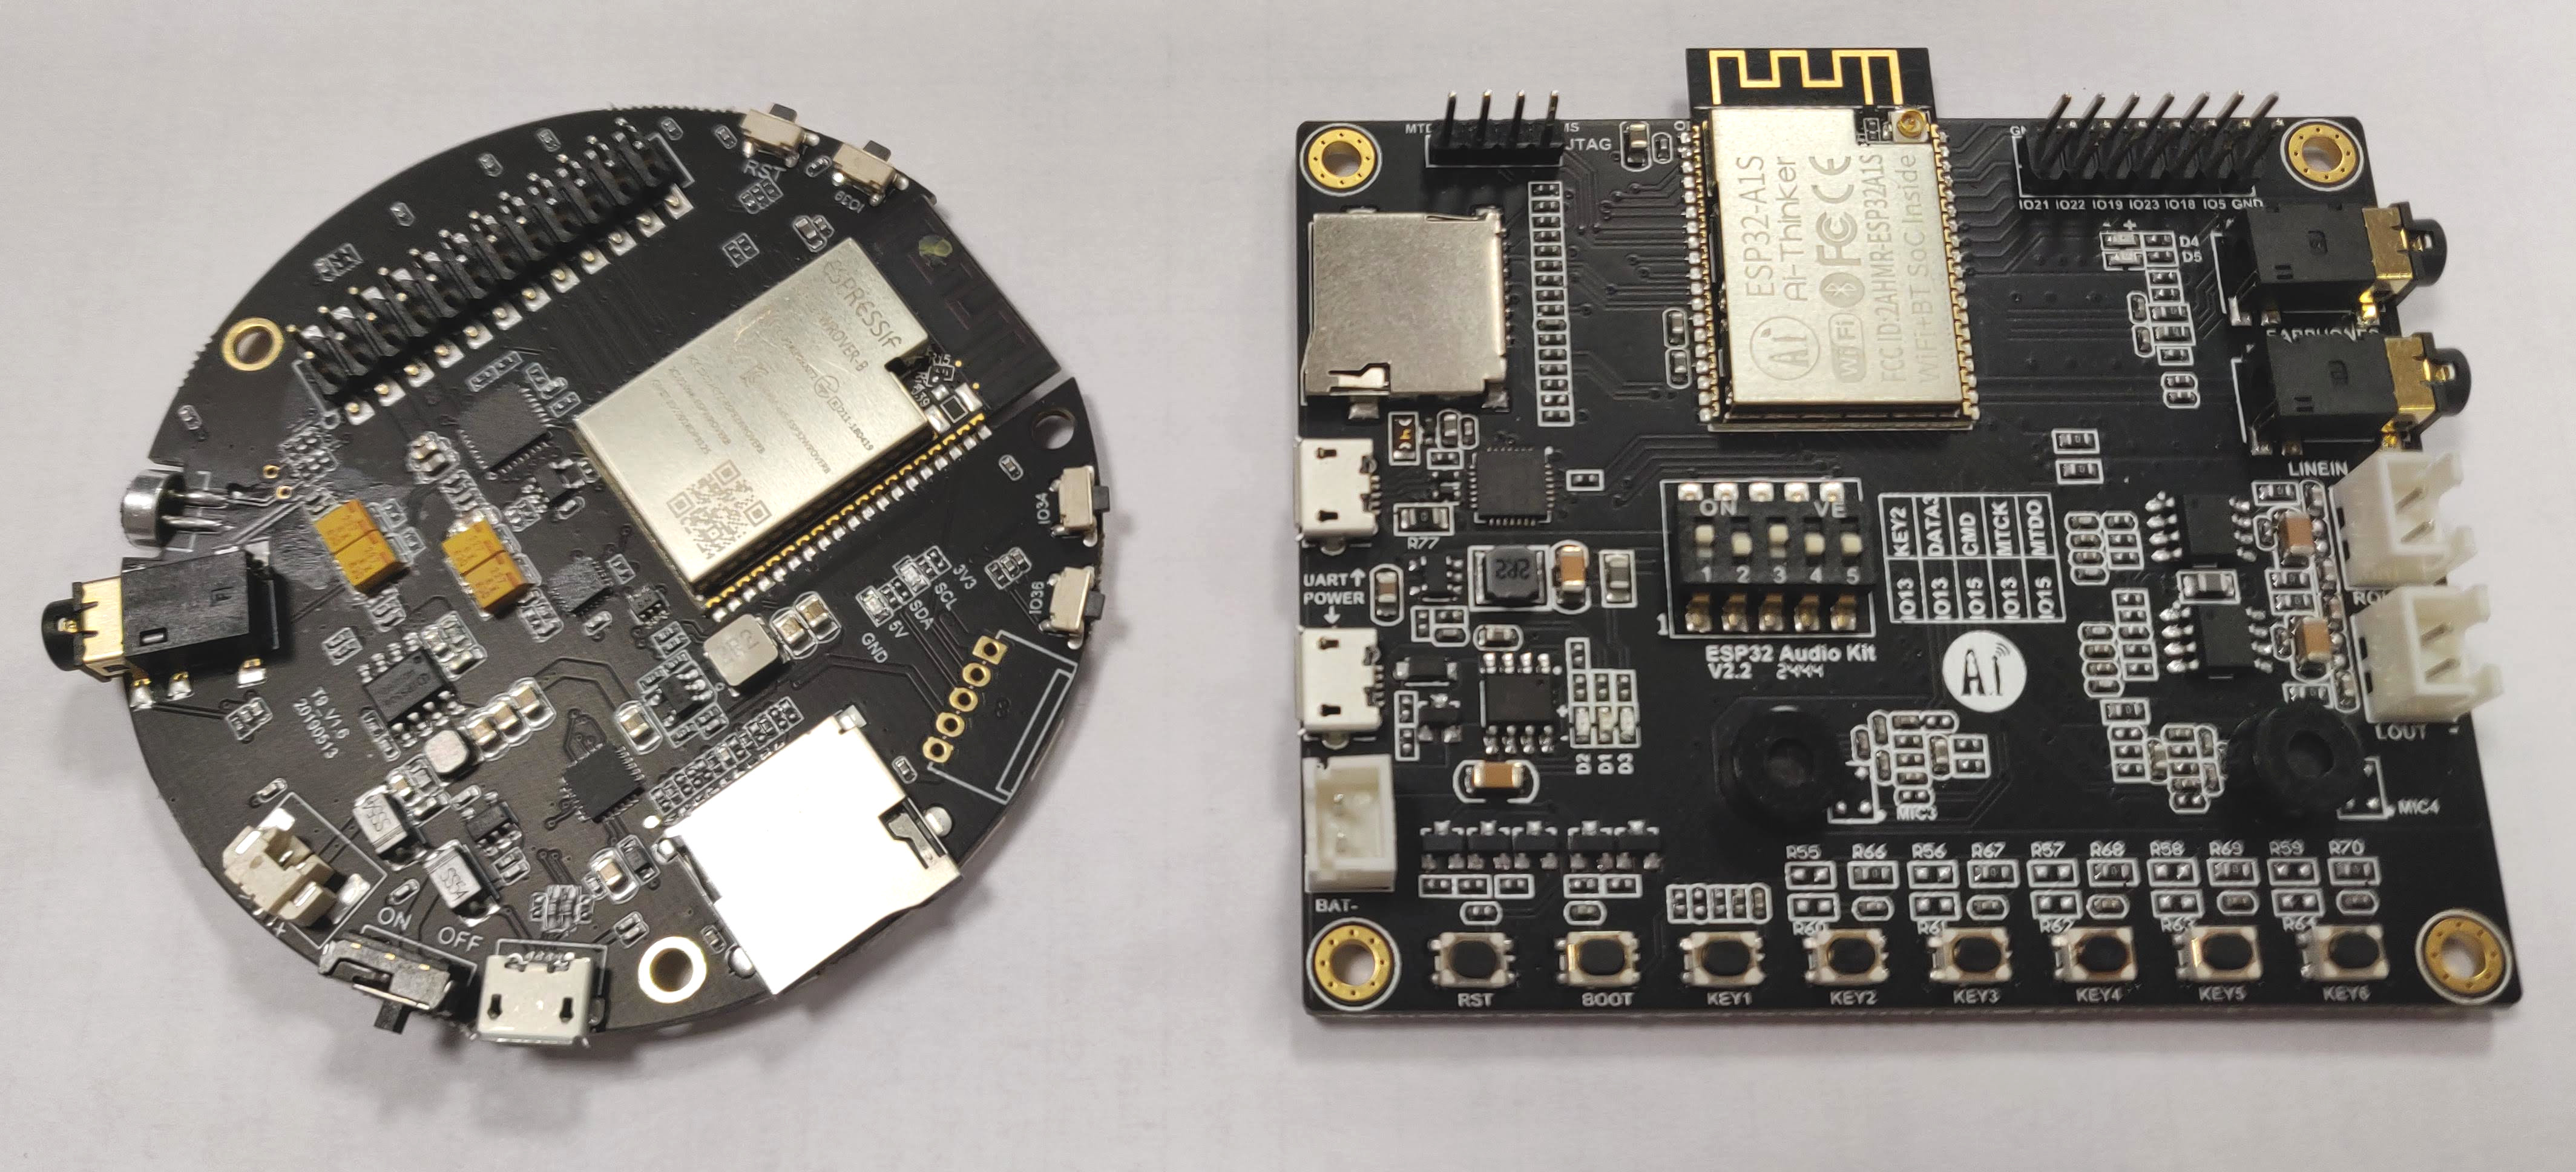
They both host relatively good-quality audio codecs with stereo inputs and outputs, a built-in amplifier, battery circuit, external RAM, and various motion sensors (only for the TTGO T-Audio), all for less than $15. Since these boards don't run any OS, very low audio latency can be achieved (i.e., buffer sizes of eight samples, etc.). Compared to the Teensy 3.6/4.0 and their respective audio shields, these boards are much cheaper, they're more powerful than the Teensy 3.6 (dual core with a much higher clock) and, most importantly, they have enough RAM to run DSP algorithms with a large memory footprint such as reverbs, echoes, etc. (which is relatively limited on the Teensy 3.6 and 4.0). Finally, the ESP32 ecosystem is entirely open source (including its loader)! In many ways, they can compete with much more expensive dedicated audio platforms such as the BELA (<$150), etc.
The Faust distribution now comes with faust2esp32, a tool to program ESP32-based boards with Faust. faust2esp32 is still under development and its current version allows you to generate DSP engines that can be used in ESP32 projects to carry out sound synthesis and processing tasks. While the mechanism (i2s) used to communicate between the ESP32 and the audio codec is the same on all boards, the brand and type of audio codecs used on ESP32-based boards vary quite a lot. faust2esp32 supports a few audio codecs which can be listed by running faust2esp32 -h or by looking at the faust2esp32 doc.
DSP engines produced by faust2esp32 are compatible with both the C++ and the Arduino development environments of the ESP32. The following two sections walk you through starting a new ESP32 project and adding Faust audio support to it using both methods.
Using the ESP32 C++ Development Environment
The final source code of this tutorial can be found here.
Programming the ESP32 with its native C++ environment offers many advantages. In particular, it allows for very fine-tuned control of the board configuration and compilation options. For example, if your DSP algorithm will have a large memory footprint, you might have no other option since external RAM will have to be activated (see Using the External RAM of the ESP32).
In this short tutorial, we walk you through creating a C++ project from scratch with audio DSP support for the TTGO T-Audio board (the procedure should be more or less the same for similar types of boards).
Starting a New ESP32 Project
Information on how to configure your ESP32 C++ development environment can be found in this tutorial (read it until the end of step 4).
Once your environment is up and running, copy the ESP32 hello_world example project somewhere on your system. Then run make, which should automatically prompt the ESP32 configuration panel. Make some modifications if needed (i.e., serial flasher config as specified in the ESP32 get started tutorial, etc.). Once you exit the menu, compilation should start and complete without any issue.
Since the DSP engine that we're about to generate with faust2esp32 uses C++, the main file of the current project should be modified to use C++ as well. To do so, just rename main/hello_world_main.c to main/main.cpp (or any other name you'd like, of course, as long as you use the cpp extension). Then, make sure the basic structure of your program looks like this:
#include <stdio.h>
#include "freertos/FreeRTOS.h"
#include "freertos/task.h"
#include "esp_system.h"
#include "esp_spi_flash.h"

extern "C" {
    void app_main(void);
}

void app_main(void)
{
  while(1) {
    vTaskDelay(1000 / portTICK_PERIOD_MS);
  }
}
Here, the infinite while loop gets ran in the main thread/task and is updated every second. Update the CMakeLists.txt file at the root of the project to change the project name (e.g., project(FaustTutorial)). Similarly, update the CMakeLists.txt file in main to set the right file for the component source (e.g., set(COMPONENT_SRCS "main.cpp")). Run make again to be sure that your program still compiles and that you didn't break anything.
Making a Simple DSP Engine
Let's now write a simple Faust program (the usual one haha) implementing a band limited sawtooth wave with smoothed control:
import("stdfaust.lib");

freq = nentry("freq",440,20,20000,0.01) : si.smoo;
gain = nentry("gain",1,0,1,0.01) : si.smoo;

process = os.sawtooth(freq)*gain;
Save it in a file called FaustSawtooth.dsp (this will define the name of the corresponding DSP engine) and compile it using faust2esp32 by running the following command:
faust2esp32 -lib FaustSawtooth.dsp
-lib asks to generate a C++ DSP engine here as opposed to a complete firmware.
Note: the current version of
faust2esp32only allows to generate DSP engines (not complete ESP32 programs) so the-liboption is not really necessary here.
Alternatively, this could be done by selecting the ESP32 target in the Faust compilation service in the online IDE.
In both cases, a .zip package containing a set of C++ files will be returned. In the current example, FaustSawtooth.[cpp/h] implement the Faust DSP object produced from FaustSawtooth.dsp and WM8978.[cpp/h] is the object corresponding to the audio codec of your board.
Note: in the current version of
faust2esp32, the only supported audio codecs are the WM8978 (-WM8978option) which is that of the TTGO T-Audio board and the AC101 (-AC101option).
All these files should be placed in the main folder of the project. After that, they should be included to main.cpp as follows:
#include <stdio.h>
#include "freertos/FreeRTOS.h"
#include "freertos/task.h"
#include "esp_system.h"
#include "esp_spi_flash.h"

#include "WM8978.h"
#include "FaustSawtooth.h"

extern "C" {
    void app_main(void);
}
Configuring the Audio Codec
Next, the WM8978 object (which corresponds to the audio codec, i.e., audio interface on the board) should be instantiated and configured in app_main:
WM8978 wm8978;
wm8978.init();
wm8978.addaCfg(1,1);
wm8978.inputCfg(1,0,0);
wm8978.outputCfg(1,0);
wm8978.micGain(30);
wm8978.auxGain(0);
wm8978.lineinGain(0);
wm8978.spkVolSet(0);
wm8978.hpVolSet(40,40);
wm8978.i2sCfg(2,0);
Once again, the current version of faust2esp32 only provides support for the Wolfson WM8978 present on the TTGO T-Audio and the AC101, but we're working at adding new codecs from other manufacturers, etc. The procedure should be similar with other codecs.
The present configuration activates the mic input, deactivates the amp for the speaker, sets the headphone gain to 40, etc. Please refer to the WM8978 object documentation for more information.
Note that each of these commands will be called "in real-time" at start-up so the configuration of the audio codec is progressively done and should be carried out before sending any audio buffer to it.
Instantiating the Faust DSP Engine
After configuring the audio codec, the Faust DSP object produced in the previous step and included in main.cpp should be instantiated in app_main as well:
int SR = 48000;
int BS = 8;
FaustSawtooth faustSawtooth(SR,BS);
faustSawtooth.start();
The constructor of FaustSawtooth takes two arguments: the sampling rate (48kHz here) and the block size (8 here). Calling the constructor will configure the object, allocate memory for it, etc. but in order to start computation, the start() method needs to be called. Since ESP32 firmwares are based on freertos, audio is computed in its own high priority task and calling start() will launch this task. Note that this task can be removed and audio computation stopped at any time simply by calling stop().
Finally, the setParamValue method of the FaustSawtooth object can be called at any point to change the value of one of the parameters of the Faust object (here, two parameters were declared: freq and gain). For example, the frequency of the generated sawtooth could be randomly changed at every sample by calling the following line in the while loop at the bottom of app_main:
faustSawtooth.setParamValue("freq",rand()%(2000-50 + 1) + 50);
At this point, main.cpp should look like this:
#include <stdio.h>
#include "freertos/FreeRTOS.h"
#include "freertos/task.h"
#include "esp_system.h"
#include "esp_spi_flash.h"

#include "WM8978.h"
#include "FaustSawtooth.h"

extern "C" {
    void app_main(void);
}

void app_main(void)
{
    WM8978 wm8978;
    wm8978.init();
    wm8978.addaCfg(1,1);
    wm8978.inputCfg(1,0,0);
    wm8978.outputCfg(1,0);
    wm8978.micGain(30);
    wm8978.auxGain(0);
    wm8978.lineinGain(0);
    wm8978.spkVolSet(0);
    wm8978.hpVolSet(40,40);
    wm8978.i2sCfg(2,0);

    int SR = 48000;
    int BS = 8;
    FaustSawtooth faustSawtooth(SR,BS);
    faustSawtooth.start();

    while(1) {
        faustSawtooth.setParamValue("freq",rand()%(2000-50 + 1) + 50);
        vTaskDelay(1000 / portTICK_PERIOD_MS);
    }
}
Try to recompile the firmware and upload it to your board. If headphones are connected to it, you should hear a sawtooth wave whose frequency changes randomly every second.
Using the External RAM of the ESP32
Some DSP algorithms might require a large amount of memory (e.g., wave tables, delays, etc.). In that case, the object generated by Faust might not fit in the built-in RAM of the ESP32 and it might be necessary to use the external RAM module (SRAM) of the board.
In order to test this, we first need to write a Faust program that will need a large amount of memory. Replacing the sawtooth wave of the previous example with a sine wave should do it since the default sine wave oscillator of Faust (os.osc) is based on a wave table of size 65536:
import("stdfaust.lib");

freq = nentry("freq",440,20,20000,0.01) : si.smoo;
gain = nentry("gain",1,0,1,0.01) : si.smoo;

process = os.osc(freq)*gain;
You can then follow the same steps as the ones described in the Making a Simple DSP Engine section to integrate this Faust program to your C++ ESP32 project.
If you try to compile your firmware again (i.e., make), you should get the following error during linking:
[...]/xtensa-esp32-elf/bin/ld: hello-world.elf section `.dram0.bss' will not fit in region `dram0_0_seg'
[...]/xtensa-esp32-elf/bin/ld: DRAM segment data does not fit.
[...]/xtensa-esp32-elf/bin/ld: region `dram0_0_seg' overflowed by 93408 bytes
collect2: error: ld returned 1 exit status
To solve this problem, the external RAM can be integrated into the memory map of the ESP32. To do so, run make menuconfig and navigate to Component Config/ESP32-specific. Then activate Support for external RAM, SPI-Connected RAM by highlighting this entry and pressing the y key. Enter the SPI RAM config/SPI RAM access method menu and choose Integrate RAM into ESP32 memory map. Then select Allow .bss segment placed in external memory and press the y key to activate this function. Finally, open FaustSawtooth.cpp (even though we're trying to synthesize a sine wave now, so the name of this file might differ in your case) and search for static float ftbl0mydspSIG0, which is the static table that will be filled with the sine wave table. This section of the C++ code generated by the Faust compiler will always contain large tables requiring lots of memory. You now want to add the EXT_RAM_ATTR attribute next to the table definition:
static float ftbl0mydspSIG0[65536] EXT_RAM_ATTR;
It tells the C++ compiler that this static table should be placed in the external memory rather than in the built-in one. In case your Faust program is doing something other than synthesizing a sine wave, you might have to put this attribute in each table definition.
Note: We're currently modifying the Faust compiler to automate this process when a specific option is given to it.
Finally, try to recompile your firmware and it should all work nicely now!
Using the Arduino Development Environment
The final source code of this tutorial can be found here.
The Arduino development environment can also be used to program the ESP32. The steps to use a Faust-generated DSP engine in that context are quite similar to those of the C++ environment described in the previous section.
First, make sure that the esp32 package is installed in the Arduino Boards Manager (Tools/Board/Boards Manager). Next, create a new empty project and save it. You can then follow the same steps as the ones described in the Making a Simple DSP Engine section of the previous tutorial; however, you should place the FaustSawtooth.[cpp/h] and WM8978.[cpp/h] files in the same folder as the one containing the .ino file of your project. The resulting project folder should now look like this:
esp32Tuto.ino
FaustSawtooth.cpp
FaustSawtooth.h
WM8978.cpp
WM8978.h
You can then edit your Arduino program as follows:
#include "freertos/FreeRTOS.h"
#include "freertos/task.h"

#include "WM8978.h"
#include "FaustSawtooth.h"

FaustSawtooth faustSawtooth(48000,8);

void setup() {
  WM8978 wm8978;
  wm8978.init();
  wm8978.addaCfg(1,1);
  wm8978.inputCfg(1,0,0);
  wm8978.outputCfg(1,0);
  wm8978.micGain(30);
  wm8978.auxGain(0);
  wm8978.lineinGain(0);
  wm8978.spkVolSet(0);
  wm8978.hpVolSet(40,40);
  wm8978.i2sCfg(2,0);

  faustSawtooth.start();
}

void loop() {
  faustSawtooth.setParamValue("freq",rand()%(2000-50 + 1) + 50);
  delay(1000);
}
and the resulting firmware should behave the same as the version presented in the previous C++ tutorial. You can refer to the Configuring the Audio Codec section to get more information about what the WM8978 lines are doing, etc.